User Tools
This is an old revision of the document!
Table of Contents
Active Frames
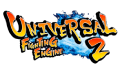
Here you can set when (and where) your move will become hit active, as well as define every aspect of the hit, from damage to frame advantage.
In this documentation sometimes you will read “frames” as a reference to time. In fighting game terminology, a frame is, based on the standard 60 fps, 1/60 of a second. For example, a move that has 30 frames lasts half a second. Don't worry though, as this tutorial makes no requirement of such frame rate.
In this example we will be using .\UFE\Characters\Demo_Character\KickCrouchingLight.asset
Hits
 Define the active frames here. Moves can have multiple hits, and you can define the timing of each hit by carefully spacing each group of active frames and adjusting frame advantage.
- Start Up (Frames): The amount of frames that this move takes before having active frames.
- Active (Frames): The amount of frames this move has during its active state.
- Recovery (Frames): The amount of frames this move has in order for this character to be safe (move again).
Active Frames: Set when will this hit becomes active during the move.
To read more about start up, active and recovery frames, follow this link.
Continuous Hit: If enabled, as long as the active hurtboxes are in contact with the opponent, a new hit will be confirmed, spaced out by its Hit Strength speed. Useful for making moves like Chun-li's Lightning Legs or Blanka's Electricity.
Space Between Hits: How much interval between each hit should it hit again. Selecting High for example will have it cause less hits.
Armor Breaker: If enabled, this move will ignore any armor an opposing move has.
Hit Strength: Set what kind of hit this is based on your hit effect options. Crumple hit can also be used as a knockdown.
Hit Type: Determine the hit conditions for this move to be blockable or trigger a different animation.
- High Low: Can be blocked high (standing) or low (crouching).
- Low: Can only be blocked low.
- Overhead: Can only be blocked high. Its recommended to always use this for air moves.
- Launcher: Can be blocked high or low. If hit, sets the opposing character direct into juggle animation.
- Knockdown: Instantly send the opponent into falling/knockdown animation.
- High Knockdown: Instantly send the opponent into
Get Hit High Knockdownanimation. This hit can only be blocked high. - High Low Knockdown: Instantly send the opponent into
Get Hit High Knockdownanimation. This hit can be blocked either high or low. - Sweep: Instantly send the opponent into
Get Hit Sweepanimation. This hit can only be blocked low. - Knock Back: Instantly send the opponent into
Get Hit Knock Backanimation. Must apply vertical force for it to work.
Hit ground opponent: If toggled on, this hit can strike opponents that are on the ground (but not knockdown).
Hit air opponent: If toggled on, this hit can strike air opponents.
Hit down opponent: If toggled on, this hit can strike knocked down opponents. Make sure you have knockdown hitboxes toggled on.
Override Hit Sound: Plays this sound instead of the default hit sound for the selected hit strength.
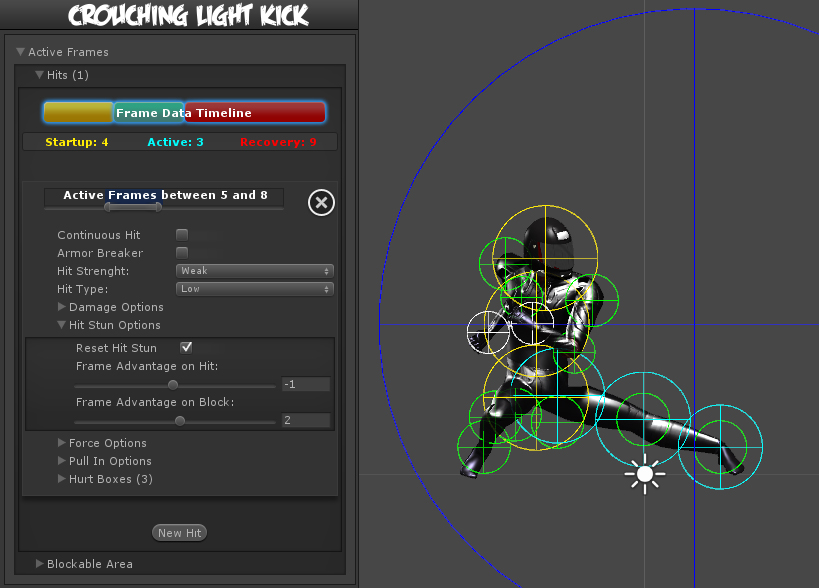
Damage Options
Damage Type: Set if the damage is in points or percentage.
Damage on Hit: Damage caused on hit.
Damage on Block: Damage caused on block.
Damage Scaling: Rather or not should this damage be scaled down based on the hits in a combo. More options available at Combo Options.
Hit Stun Options
Reset Hit Stun: If you are using hit stun deterioration, enable this to reset the stun and its deterioration value.
Hit Stun Type - Frame Advantage
You can choose to set your hit stun as a static frame advantage value. In UFE, frame advantage is calculated by accounting the remaining frames of an animation when it hits plus the defined values below. Frame advantage does not take into consideration move cancels, just the total animation frames.
- Frame Advantage on Hit: If positive, after this move animation ends, the opposing character will remain in hit stun for this amount of frames. For more information about frame advantage, check out this link.
- Frame Advantage on Block: If positive, after this move animation ends, the opposing character will remain in block stun for this amount of frames. For more information about frame advantage, check out this link.
To quote Ashn0d from Eventhubs on frame advantage:
A positive number means how many frames faster than your
opponent you will recover after successfully hitting them
with this attack. Negative numbers mean how much faster
your opponent will recover than you after being hit.
Hit Stun Type - Frames
Set the hit stun as a raw frame count format.
- Hit Stun on Hit: The amount of frames the opponent will remain stunned for after a hit.
- Hit Stun on Block: The amount of frames the opponent will remain stunned for after a block.
Hit Stun Type - Seconds
Set the hit stun time in seconds.
- Hit Stun on Hit: The amount of seconds the opponent will remain stunned for after a hit.
- Hit Stun on Block: The amount of seconds the opponent will remain stunned for after a block.
Force Options
Opponent/Self:
- Reset X Forces: Reset any previous horizontal forces applied to the target before applying new forces.
- Reset Y Forces: Reset any previous vertical forces applied to the target before applying new forces.
- Applied Force: The horizontal (x) and vertical (y) forces that will be applied to the target on hit. These forces may vary according to friction, character weight and gravity.
Pull In Options
Pulls characters close to one another until the determined body parts collide. Useful for moves that needs to adjust the opponent in a fixed position before applying a hit. Much like Ibuki's Raida attack.
If you apply a low speed, this can also be used to pull enemies in as it follows an animation. Without going into much detail, something like Scorpion's Spear hook could be coded using this.
Opponent Towards Self: Pulls the opponent towards the character.
Self Towards Opponent: Pulls the character towards the opponent.
- Speed: Speed in witch the body parts will run into one another.
- Body Part (self): The character's body part that will magnetize towards the opponent's body part.
- Body Part (enemy): The opponent's body part that will magnetize towards the character's body part.
Hurt Boxes
Hurt boxes are the selected body parts from your character (previously set on Hit Box Setup) that become active during your move. When they collide with the opponent, a hit is detected. Each hit can be filled with several different sets of hurt boxes.
Body Part: The selected body part that will hold the hurt box.
Radius: The size of this hurt box. Sometimes, for balancing purposes, you might want to have bigger hurt boxes than the animation seems to have. This can be adjusted here.
Off Set: Off sets the hurt box positions.
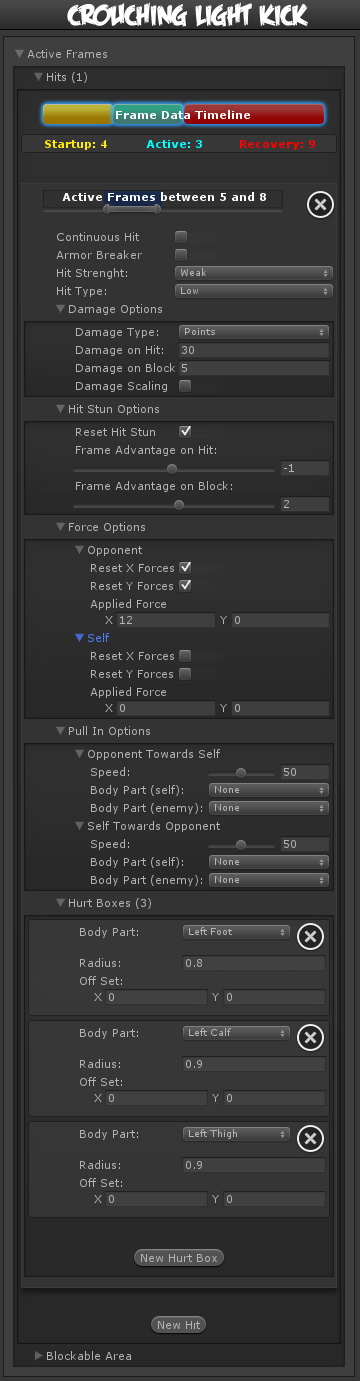
Blockable Area
The area witch will trigger a blocking pose from the opponent if they are holding the block button. Leave the radius at 0 if you want this move to be unblockable.
Active Frames: The frames in witch the opponent can block this move. Its recommended to have it covering all the active hit frames.
Body Part: The body part in witch the block area will spawn and follow.
Off Set: If necessary, off set the area.
Note: By default the block area is already set to move about half a unit forward.
Code example:
void OnHit(HitBox strokeHitBox, MoveInfo move, CharacterInfo hitter){
	foreach(Hit hit in move.hits){
		Debug.Log ("Damage: "+ hit.damageOnHit);
	}
}